Skip to content

Instantly share code, notes, and snippets.

@michthom
Forked from welsh/README.md
Last active November 14, 2017 15:35
Show Gist options
  • Save michthom/e70bb7f4f4c74c8350ce to your computer and use it in GitHub Desktop.
Save michthom/e70bb7f4f4c74c8350ce to your computer and use it in GitHub Desktop.

Server Status Squares

A Dashing widget that checks whether a server is responding to either an http or ping request using smaller squares to represent its status.

This is based on the Server Status widget that willjohnson developed.

welsh modified it to work across multiple squares rather than be one square with a list.

I've extended it a little to offer more types of connectivity test, and to be a little more flexible in how success / errors are reflected back to the user.

Description

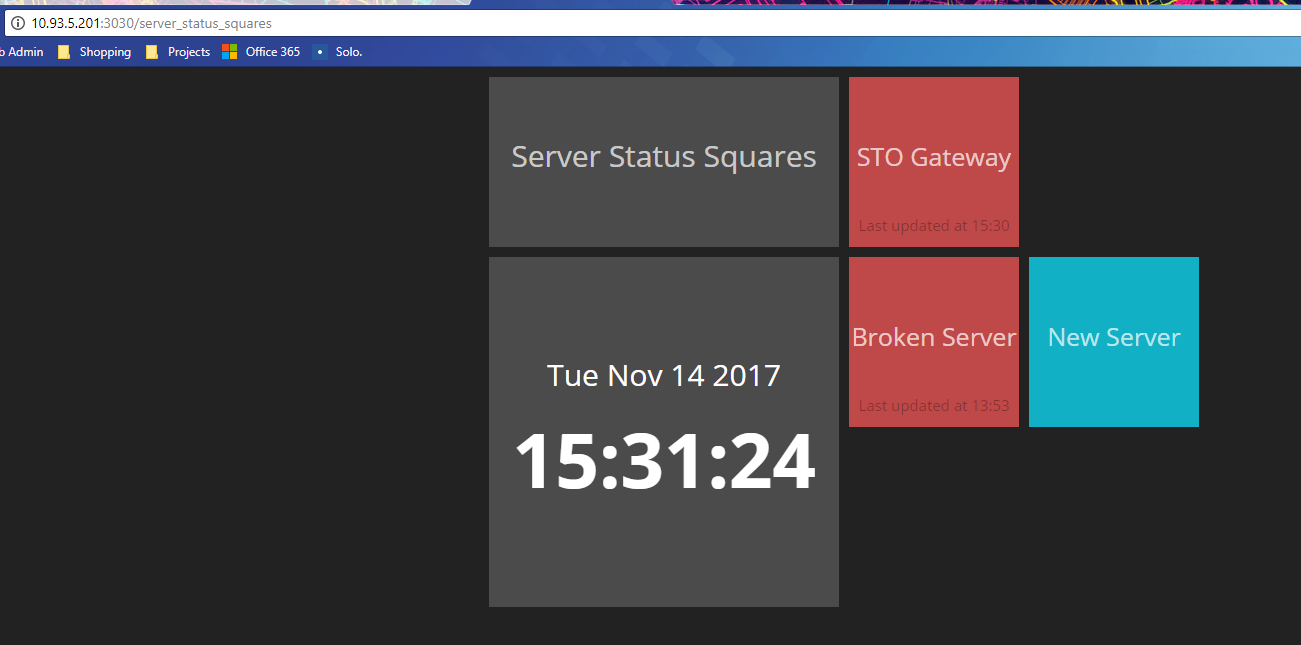
The widget updates the appropriate squares color upon determining its status. Default statuses are shown as follows:

  • Blue represents a new square that hasn't had any data sent to it yet.
  • Green represents that the square is responding properly
  • Red represents that there is an issue. (Ping failed, non 200 response, etc.)

Example:

Setup - Auto

  1. Within your dashing project do dashing install e70bb7f4f4c74c8350ce

  2. Create a new file server_status_squares.erb in your dashboards directory. See the example below.

  3. Run Dashing and navigate to http://localhost:3030/server_status_squares which will show the example dashboard.

Setup - Manual

  1. Copy the contents of server_status_squares.erb into your dashboards directory.

  2. Create a directory called server_status_squares under your widgets directory and copy the contents of the following files under it:

    • server_status_squares.coffee
    • server_status_squares.html
    • server_status_squares.scss
  3. Copy the contents of server_status_squares.rb into your jobs directory.

  4. Run Dashing and navigate to http://localhost:3030/server_status_squares which will show this example dashboard:

Adjusting

To add a new server, add the following into your dashboard:

<li data-row="2" data-col="4" data-sizex="1" data-sizey="1">
    <div data-id="sss-mynewserver" data-view="ServerStatusSquares" data-title="My Server"></div>
</li>

Then in your server_status_squares.rb file within the jobs directory adjust the servers array to add a new entry:

{name: 'sss-mynewserver', url: 'ping://192.168.1.150'},

You need to ensure that the data-id of the dashboard entry matches the name in the new servers array entry.

The names are up to you. I use the sss- prefix so I know its a Server Status Squares entry.

Notes

Managing large number of servers
Depending on the number of squares you want to manage and the polling duration you may want to create multiple Server Status Squares jobs.

For example if you have say 60 servers listed and it runs every 60 seconds you may run into issues with jobs overlapping.

Adjusting polling duration
To adjust the polling duration, open up the server_status_squares.rb job file and modify the main scheduler line which is currently set at 60 seconds. The line is:

SCHEDULER.every '60s', :first_in => 0 do |job|

You can modify the '60s' to be any number for seconds. To configure it to 5 minutes you can do '5m'.

Cube Sizing
I've found that doing a Dashing.widget_base_dimensions = [170, 170] works best to fit an optimal number of Squares on a 1080p Dashboard as you can do 10 across and 6 down for a total of 60 Squares.

This can provide you a quick glance system to see if there are any issues with any of the servers as the Red Square will stand out in the sea (of hopefully) Green Squares.

You can still create squares that are almost the same size as the Example dashboards base squares by setting data-sizex="2" data-sizey="2" for the li entry. You can see this in the server_status_squares.erb file for the Clock. (It will be shorter vertically by 30px.)

API
To manually update the data of the widget, you can update via HTTP as described in the Dashing Data section. To do this, find the data-id of the ServerStatusSquares widget and send it "result": 1 if its up or "result": 0 if its down.

For example with the server_status_squares dashboard that was provided, the New Server square isn't hooked up to the server_status_squares.rb job.

You can update it to show that is is up with:

curl -d '{ "auth_token": "YOUR_AUTH_TOKEN", "result": 1 }' http://localhost:3030/widgets/sss-newserver

Or that it is down with:

curl -d '{ "auth_token": "YOUR_AUTH_TOKEN", "result": 0 }' http://localhost:3030/widgets/sss-newserver
class Dashing.ServerStatusSquares extends Dashing.Widget
onData: (data) ->
$(@node).fadeOut().fadeIn()
color = if data.result == 1 then "#96BF48" else "#BF4848"
$(@get('node')).css('background-color', "#{color}")
<script type='text/javascript'>
$(function() {
Dashing.widget_base_dimensions = [170, 170]
Dashing.numColumns = 10
});
</script>
<% content_for :title do %>Status Status Squares<% end %>
<div class="gridster">
<ul>
<li data-row="2" data-col="1" data-sizex="2" data-sizey="2">
<div data-view="Clock" style="background-color: #4b4b4b"></div>
<i class="icon-time icon-background"></i>
</li>
<li data-row="1" data-col="1" data-sizex="2" data-sizey="1">
<div data-id="welcome" data-view="Text" data-title="Server Status Squares" style="background-color: #4b4b4b"></div>
</li>
<li data-row="1" data-col="3" data-sizex="1" data-sizey="1">
<div data-id="sss-gateway" data-view="ServerStatusSquares" data-title="Gateway"></div>
</li>
<li data-row="2" data-col="3" data-sizex="1" data-sizey="1">
<div data-id="sss-brokenserver" data-view="ServerStatusSquares" data-title="Broken Server"></div>
</li>
<li data-row="2" data-col="4" data-sizex="1" data-sizey="1">
<div data-id="sss-newserver" data-view="ServerStatusSquares" data-title="New Server"></div>
</li>
</ul>
</div>
<h1 class="title" data-bind="title"></h1>
<p class="updated-at" data-bind="updatedAtMessage"></p>
#!/usr/bin/env ruby
require 'uri'
require 'net/http'
require 'net/telnet'
#
### Global Config
#
# httptimeout => Number in seconds for HTTP Timeout. Set to ruby default of 60 seconds.
# ping_count => Number of pings to perform for the ping method
#
httptimeout = 60
ping_count = 10
#
# Check whether a server is Responding you can set a server to
# check via http request or ping
#
# Server Options
# name
# => The name of the Server Status Tile to Update
# url
# => Either a website url or an IP address. Do not include https:// when using ping method.
# method
# => http
# => ping
#
# Notes:
# => If the server you're checking redirects (from http to https for example)
# the check will return false
#
servers = [
{name: 'sss-gateway', url: 'ping://192.168.1.1' },
{name: 'sss-google', url: 'http://google.co.uk' },
{name: 'sss-gmail', url: 'telnet://smtp.gmail.com:565' },
{name: 'sss-broken', url: 'http://1.2.3.4' }
]
SCHEDULER.every '1m', :first_in => 0 do |job|
servers.each do |server|
begin
uri = URI.parse(server[:url])
case uri.scheme
when 'http'
http = Net::HTTP.new(uri.host, uri.port)
http.read_timeout = httptimeout
response = Net::HTTP::get_response(uri)
if response.is_a?(Net::HTTPError)
result = 0
else
result = 1
end
when 'https'
http = Net::HTTP.new(uri.host, uri.port)
http.read_timeout = httptimeout
http.use_ssl=true
http.verify_mode = OpenSSL::SSL::VERIFY_NONE
response = Net::HTTP::get_response(uri)
if response.is_a?(Net::HTTPError)
result = 0
else
result = 1
end
when 'ping'
result = `ping -q -c #{ping_count} #{uri.host}`
if ($?.exitstatus == 0)
result = 1
else
result = 0
end
when 'telnet'
result = 0
connection = Net::Telnet::new(
"Host" => uri.host,
"Port" => uri.port,
"Timeout" => 5,
"Telnetmode" => false
)
result = 1
connection.close()
else
print "I have no idea how to handle URLs with a scheme of #{uri.scheme}\n"
end
rescue Timeout::Error
result = 0
rescue Errno::ETIMEDOUT
result = 0
rescue Errno::EHOSTUNREACH
result = 0
rescue Errno::ECONNREFUSED
result = 0
rescue SocketError => e
result = 0
end
send_event(server[:name], result: result)
end
end
// ----------------------------------------------------------------------------
// Widget Styles
// ----------------------------------------------------------------------------
.widget-server-status-squares {
background-color: #12b0c5;
vertical-align: top;
.title {
color: rgba(255, 255, 255, 0.7);
font-size: 25px;
}
.updated-at {
color: rgba(0, 0, 0, 0.3);
}
}
@henryp007
Copy link

Thanks for the code! for some reason the icons only ever show up as red.
Is there a fix for this?
image

Sign up for free to join this conversation on GitHub. Already have an account? Sign in to comment