|
|
@@ -0,0 +1,354 @@ |
|
|
# Authentication and Authorization |
|
|
|
|
|
*Authentication* means determining who a particular user is. *Authorization* means applying rules about what they can do. Blazor contains features for handling both aspects of this. |
|
|
|
|
|
It worth remembering how the overall goals differ between server-side Blazor and client-side Blazor: |
|
|
|
|
|
* Server-side Blazor applications run on the server. As such, correctly-implemented authorization checks are both how you determine which UI options to show (e.g., which menu entries are available to a certain user) *and* where you actually enforce access rules. |
|
|
* Client-side Blazor applications run on the client. As such, authorization is *only* used as a way of determining what UI options to show (e.g., which menu entries). The actual enforcement of authorization rules *must* be implemented on whatever backend server your application operates on, since any client-side checks can be modified or bypassed. |
|
|
|
|
|
## Authentication-enabled templates for Server-Side Blazor |
|
|
|
|
|
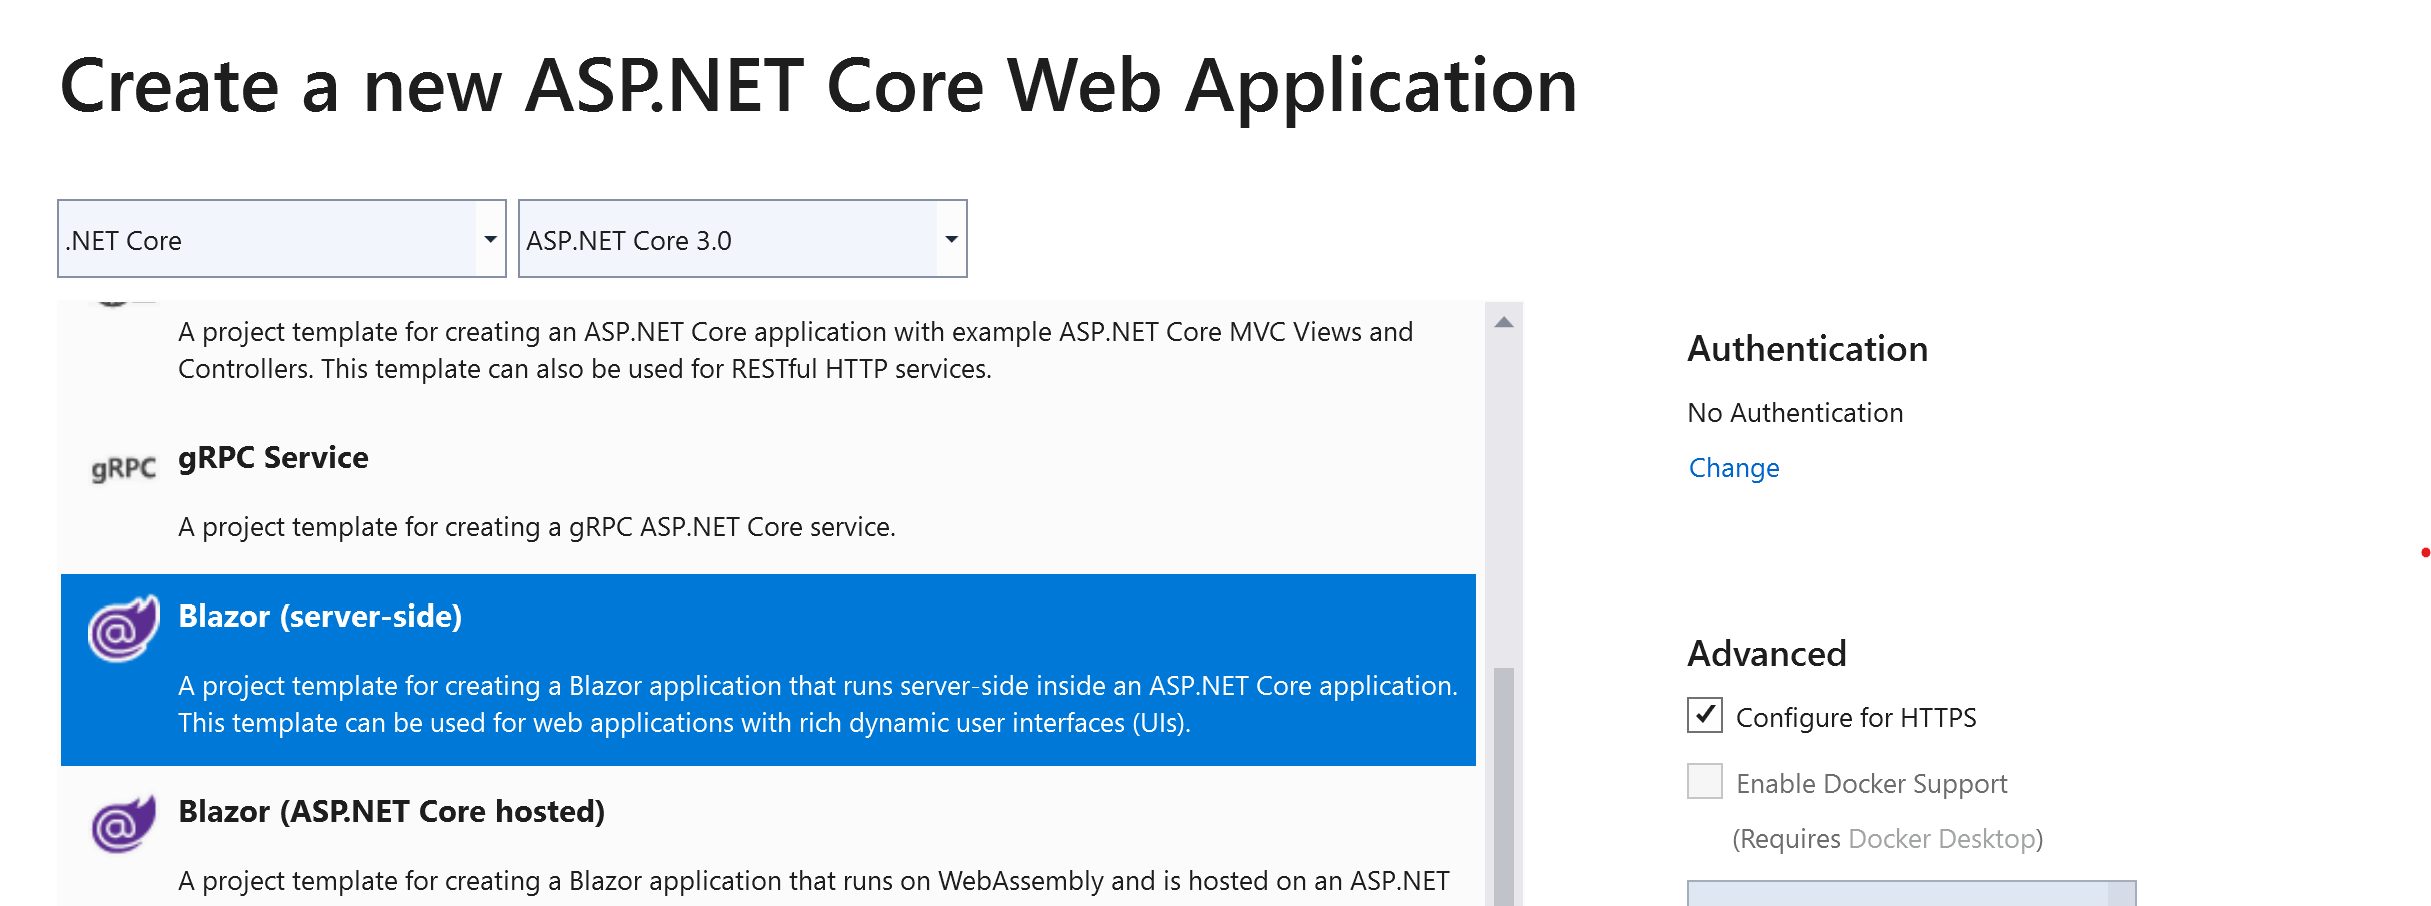
If you're creating a new server-side Blazor application, the project template can set up an authentication mechanism for you. During project creation, click on *Change* under *Authentication*. |
|
|
|
|
|
 |
|
|
|
|
|
This will open a dialog that offers the same set of authentication mechanisms available for other ASP.NET Core projects, i.e.: |
|
|
|
|
|
* No authentication (default) |
|
|
* Individual user accounts |
|
|
* ... stored within the app, using ASP.NET Core's [Identity](https://docs.microsoft.com/en-us/aspnet/core/security/authentication/identity?view=aspnetcore-3.0&tabs=visual-studio) system |
|
|
* ... stored in the cloud, using [Azure AD B2C](https://docs.microsoft.com/en-us/aspnet/core/security/authentication/azure-ad-b2c?view=aspnetcore-3.0) |
|
|
* Work or School accounts |
|
|
* [Windows authentication](https://docs.microsoft.com/en-us/aspnet/core/security/authentication/windowsauth?view=aspnetcore-3.0&tabs=visual-studio) |
|
|
|
|
|
The actual mechanism of authenticating the user, i.e., determining their identity using cookies or other information, is the same in Blazor as in any other ASP.NET Core application. So to control and customize any aspect of it, see documentation about [authentication in ASP.NET Core](https://docs.microsoft.com/en-us/aspnet/core/security/?view=aspnetcore-3.0). |
|
|
|
|
|
The result is that your project will track the identity of the logged-in user. You can then apply authorization rules to users as described below. |
|
|
|
|
|
 |
|
|
|
|
|
## Accessing information about the current user |
|
|
|
|
|
There are three ways to access information about the current user. Each is useful in different cases. |
|
|
|
|
|
### 1. Using <AuthorizeView> to display user information |
|
|
|
|
|
This is the simplest and most high-level way to access authentication data, and is useful when you only need to *display* the data, and don't need to use it in procedural logic. |
|
|
|
|
|
The `<AuthorizeView>` component exposes a `context` variable of type `AuthenticationState`, which you can use to display information about the logged-in user: |
|
|
|
|
|
```html |
|
|
<AuthorizeView> |
|
|
<h1>Hello, @context.User.Identity.Name!</h1> |
|
|
You can only see this content if you're authenticated. |
|
|
</AuthorizeView> |
|
|
``` |
|
|
|
|
|
You can also supply different content to be displayed if the user isn't authenticated: |
|
|
|
|
|
```html |
|
|
<AuthorizeView> |
|
|
<Authorized> |
|
|
<h1>Hello, @context.User.Identity.Name!</h1> |
|
|
You can only see this if you're authenticated. |
|
|
</Authorized> |
|
|
<NotAuthorized> |
|
|
You're not logged in. |
|
|
</NotAuthorized> |
|
|
</AuthorizeView> |
|
|
``` |
|
|
|
|
|
The content doesn't have to be static HTML. It can include arbitrary items, such as other interactive components. |
|
|
|
|
|
It's also possible to specify authorization conditions such as roles or policies. This is covered later in this document. If no authorization conditions are specified, then `<AuthorizeView>` treats all authenticated (logged-in) users as authorized, and unauthenticated (logged-out) users as unauthorized. |
|
|
|
|
|
**Troubleshooting:** If you receive an error saying *Authorization requires a cascading parameter of type Task<AuthenticationState>. Consider using CascadingAuthenticationState to supply this.*, then it's likely you didn't create your project using one of the authentication templates. In this case, you need to wrap a `<CascadingAuthenticationState>` around some part of your UI tree, for example in `App.razor` as follows: |
|
|
|
|
|
```html |
|
|
<CascadingAuthenticationState> |
|
|
<Router AppAssembly="typeof(Startup).Assembly"> |
|
|
... |
|
|
</Router> |
|
|
</CascadingAuthenticationState> |
|
|
``` |
|
|
|
|
|
|
|
|
### 2. Using a cascaded Task<AuthenticationState> |
|
|
|
|
|
If you need to use authentication state data as part of procedural logic, such as when performing an action triggered by the user, then you should obtain it by receiving a cascaded parameter of type `Task<AuthenticationState>`. |
|
|
|
|
|
```cs |
|
|
@page "/" |
|
|
|
|
|
<button @onclick="@LogUsername">Log username</button> |
|
|
|
|
|
@code { |
|
|
[CascadingParameter] Task<AuthenticationState> authenticationStateTask { get; set; } |
|
|
|
|
|
async Task LogUsername() |
|
|
{ |
|
|
var authState = await authenticationStateTask; |
|
|
var user = authState.User; |
|
|
if (user.Identity.IsAuthenticated) |
|
|
{ |
|
|
// Since the user is a ClaimsPrincipal, you can also enumerate claims, |
|
|
// evaluate membership in roles, etc. |
|
|
Console.WriteLine($"Hello, {user.Identity.Name}"); |
|
|
} |
|
|
else |
|
|
{ |
|
|
Console.WriteLine("You're not logged in."); |
|
|
} |
|
|
} |
|
|
} |
|
|
``` |
|
|
|
|
|
**Troubleshooting:** If you receive a `null` value for `authenticationStateTask`, then then it's likely you didn't create your project using one of the authentication templates. In this case, you need to wrap a `<CascadingAuthenticationState>` around some part of your UI tree, for example in `App.razor` as follows: |
|
|
|
|
|
```html |
|
|
<CascadingAuthenticationState> |
|
|
<Router AppAssembly="typeof(Startup).Assembly"> |
|
|
... |
|
|
</Router> |
|
|
</CascadingAuthenticationState> |
|
|
``` |
|
|
|
|
|
The `<CascadingAuthenticationState>` supplies the `Task<AuthenticationState>` cascading parameter, which in turn it gets from the underlying `AuthenticationStateProvider` DI service. |
|
|
|
|
|
### 3. Using the AuthenticationStateProvider DI service |
|
|
|
|
|
This is the lowest-level way to access authentication |
|
|
state. In most cases you won't want to use this directly, as there are more convenient alternatives as described previously. However it's worth understanding that this exists, because it's the underlying feature that supports more high-level alternatives. |
|
|
|
|
|
The `AuthenticationStateProvider` is a DI service that can give you the current user's `ClaimsPrincipal` data. |
|
|
|
|
|
```cs |
|
|
@page "/" |
|
|
@inject AuthenticationStateProvider AuthenticationStateProvider |
|
|
|
|
|
<button @onclick="@LogUsername">Write user info to console</button> |
|
|
|
|
|
@code { |
|
|
async Task LogUsername() |
|
|
{ |
|
|
var authState = await AuthenticationStateProvider.GetAuthenticationStateAsync(); |
|
|
var user = authState.User; |
|
|
if (user.Identity.IsAuthenticated) |
|
|
{ |
|
|
// Since the user is a ClaimsPrincipal, you can also enumerate claims, |
|
|
// evaluate membership in roles, etc. |
|
|
Console.WriteLine($"Hello, {user.Identity.Name}!"); |
|
|
} |
|
|
else |
|
|
{ |
|
|
Console.WriteLine("You're not logged in."); |
|
|
} |
|
|
} |
|
|
} |
|
|
``` |
|
|
|
|
|
The main drawback to using `AuthenticationStateProvider` directly is that your component won't be notified automatically if the underlying authentication state data changes. That's why it's normally preferable to use the cascaded `Task<AuthenticationState>` instead. |
|
|
|
|
|
## Implementing a custom AuthenticationStateProvider |
|
|
|
|
|
Server-side Blazor has a built-in `AuthenticationStateProvider` DI service that obtains authentication state data from ASP.NET Core's server-side `HttpContext.User`. This is how it integrates with all the existing server-side authentication mechanisms. |
|
|
|
|
|
**For server-side Blazor, it is very unlikely that you should implement a custom `AuthenticationStateProvider`.** The built-in implementation already integrates with ASP.NET Core's built-in authentication mechanisms. If you implement a custom one, you may introduce security vulnerabilities. |
|
|
|
|
|
The only common scenario for a custom `AuthenticationStateProvider` is client-side Blazor, because in that case you may want to integrate with any number of external authentication systems independently of your server-side code. Also, in client-side Blazor, authentication only exists to present a convenient UI to well-behaved users - it's not actually the place where security is enforced, since client-side rules can always be bypassed. |
|
|
|
|
|
So, if you're building a client-side Blazor application, or if your requirements are different in some other way, you could choose to implement your own `AuthenticationStateProvider` that gets data from some other source. For example, |
|
|
|
|
|
```cs |
|
|
class FakeAuthenticationStateProvider : AuthenticationStateProvider |
|
|
{ |
|
|
public override Task<AuthenticationState> GetAuthenticationStateAsync() |
|
|
{ |
|
|
var identity = new ClaimsIdentity(new[] |
|
|
{ |
|
|
new Claim(ClaimTypes.Name, "Some fake user"), |
|
|
}, "Fake authentication type"); |
|
|
|
|
|
var user = new ClaimsPrincipal(identity); |
|
|
return Task.FromResult(new AuthenticationState(user)); |
|
|
} |
|
|
} |
|
|
``` |
|
|
|
|
|
You can register this with DI in your `Startup` class as follows: |
|
|
|
|
|
```cs |
|
|
public void ConfigureServices(IServiceCollection services) |
|
|
{ |
|
|
// ... other services added here ... |
|
|
|
|
|
services.AddScoped<AuthenticationStateProvider, FakeAuthenticationStateProvider>(); |
|
|
} |
|
|
``` |
|
|
|
|
|
With this custom `AuthenticationStateProvider`, all users will now be treated as authenticated with the username `Some fake user`. |
|
|
|
|
|
Note that if you want to use `<AuthorizeView>` or a cascaded parameter of type `Task<AuthenticationState>`, then you still also need to ensure you have wrapped a `<CascadingAuthenticationState>` around the relevant part of your UI hierarchy, for example in `App.razor`. |
|
|
|
|
|
#### Notifying about authentication state changes |
|
|
|
|
|
If you determine that your underlying authentication state data has changed (e.g., because the user logged out, or another user has changed their roles), then your custom authentication state provider can optionally invoke the method `NotifyAuthenticationStateChanged` on the `AuthenticationStateProvider` base class. This notifies consumers of the authentication state data (e.g., `<AuthorizeView>` components) that they need to re-render using the new data. |
|
|
|
|
|
## Authorization |
|
|
|
|
|
Once you've determined who a user is, you can apply *authorization* rules to control what they can do. |
|
|
|
|
|
You could grant or deny access based on: |
|
|
|
|
|
* ...whether a user is authenticated (logged in) |
|
|
* ...whether a user is in a certain *role* |
|
|
* ...whether a user has a certain *claim* |
|
|
* ...whether a certain *policy* is satisfied |
|
|
|
|
|
Each of these concepts is the same as in ASP.NET Core MVC or Razor Pages. |
|
|
|
|
|
### 1. Using <AuthorizeView> |
|
|
|
|
|
The `<AuthorizeView>` component supports *role-based* or *policy-based* authorization. |
|
|
|
|
|
For role-base authorization, use the `Roles` parameter. For more information, see documentation about [user roles](https://docs.microsoft.com/en-us/aspnet/core/security/authorization/roles?view=aspnetcore-3.0). |
|
|
|
|
|
```html |
|
|
<AuthorizeView Roles="admin, superuser"> |
|
|
You can only see this if you're an admin or superuser. |
|
|
</AuthorizeView> |
|
|
``` |
|
|
|
|
|
For policy-based authorization, use the `Policy` parameter. For more information, see documentation about [policies](https://docs.microsoft.com/en-us/aspnet/core/security/authorization/policies?view=aspnetcore-3.0). This explains how to define authorization policies. These APIs can be used with either server-side or client-side Blazor. |
|
|
|
|
|
```html |
|
|
<AuthorizeView Policy="content-editor"> |
|
|
You can only see this if you satify the "content-editor" policy. |
|
|
</AuthorizeView> |
|
|
``` |
|
|
|
|
|
Note that claims-based authorization is a special case of policy-based authorization. For example, you can define a policy that requires users to have a certain claim. |
|
|
|
|
|
If neither `Roles` nor `Policy` is specified, then `<AuthorizeView>` uses the default policy, which by default is to treat authenticated users as authorized, and unauthenticated users as unauthorized. |
|
|
|
|
|
#### Content displayed during asynchronous authentication |
|
|
|
|
|
Blazor allows for authentication state to be determined *asynchronously*, i.e., the underlying `AuthenticationStateProvider` supplies a `Task<AuthenticationState>`. The main scenario where this matters is with client-side Blazor, as your app may need to make a request to an external endpoint to request authentication information. |
|
|
|
|
|
So, what content should `<AuthorizeView>` display while authentication is in progress? By default, it displays nothing. But if you want, you can specify some content to be displayed during this process: |
|
|
|
|
|
```html |
|
|
<AuthorizeView> |
|
|
<Authorized>Hello, @context.User.Identity.Name!</Authorized> |
|
|
<Authorizing>Please wait...</Authorizing> |
|
|
</AuthorizeView> |
|
|
``` |
|
|
|
|
|
Note that this isn't applicable for server-side Blazor by default, because by default, server-side Blazor always knows the authentication state immediately. As such you can specify `Authorizing` content if you wish, but it would never be displayed. |
|
|
|
|
|
### 2. Using the [Authorize] attribute |
|
|
|
|
|
Just like you can use `[Authorize]` with MVC controller or Razor pages, you can also use it with page components. |
|
|
|
|
|
```html |
|
|
@page "/" |
|
|
@attribute [Authorize] |
|
|
|
|
|
You can only see this if you're logged in. |
|
|
``` |
|
|
|
|
|
**Important:** it's only applicable to use `[Authorize]` on `@page` components reached via the router. Authorization is only performed as an aspect of routing, and *not* for child components rendered within a page. To authorize the display of specific parts within a page, use `<AuthorizeView>` instead. |
|
|
|
|
|
Note that you may need to add `@using Microsoft.AspNetCore.Authorization` either to your page component or to `_Imports.razor` in order for this to compile. |
|
|
|
|
|
The `[Authorize]` attribute also supports role-based or policy-based authorization. For role-based authorization, use the `Roles` parameter: |
|
|
|
|
|
```html |
|
|
@page "/" |
|
|
@attribute [Authorize(Roles = "admin, superuser")] |
|
|
|
|
|
You can only see this if you're in the 'admin' or 'superuser' role. |
|
|
``` |
|
|
|
|
|
For policy-based authorization, use the `Policies` parameter: |
|
|
|
|
|
```html |
|
|
@page "/" |
|
|
@attribute [Authorize(Policy = "content-editor")] |
|
|
|
|
|
You can only see this if you satisfy the 'content-editor' policy. |
|
|
``` |
|
|
|
|
|
If neither `Roles` nor `Policy` is specified, then `[Authorize]` uses the default policy, which by default is to treat authenticated users as authorized, and unauthenticated users as unauthorized. |
|
|
|
|
|
### Customizing the display for unauthenticated users |
|
|
|
|
|
The `Router` component allows you to specify custom content to be rendered if a user fails an `[Authorize]` condition, or while asynchronous authentication is in progress. In the default project templates, this can be found in your `App.razor` file: |
|
|
|
|
|
```html |
|
|
<CascadingAuthenticationState> |
|
|
<Router AppAssembly="typeof(Startup).Assembly"> |
|
|
<NotFoundContent> |
|
|
<p>Sorry, there's nothing at this address.</p> |
|
|
</NotFoundContent> |
|
|
<NotAuthorizedContent> |
|
|
<h1>Sorry</h1> |
|
|
<p>You're not authorized to reach this page. You may need to log in as a different user.</p> |
|
|
</NotAuthorizedContent> |
|
|
<AuthorizingContent> |
|
|
<p>Please wait...</p> |
|
|
</AuthorizingContent> |
|
|
</Router> |
|
|
</CascadingAuthenticationState> |
|
|
``` |
|
|
|
|
|
As always, the content doesn't just have to be static HTML. You can include arbitrary content, such as interactive components. |
|
|
|
|
|
If no `NotAuthorizedContent` is specified, then the router uses the following fallback message: |
|
|
|
|
|
``` |
|
|
Not authorized. |
|
|
``` |
|
|
|
|
|
**Known issue:** In ASP.NET Core 3.0 Preview 6, it's not possible to specify custom `NotAuthorizedContent` or `AuthorizingContent` on the `Router` component with server-side Blazor (though it does work with client-side Blazor). This will be fixed in the Preview 7 release. |
|
|
|
|
|
### 3. Using procedural logic |
|
|
|
|
|
If you need to check authorization rules as part of procedural logic, you can receive a cascaded parameter of type `Task<AuthenticationState>`. This can be used to obtain the user's `ClaimsPrincipal`, which in turn can be combined with other services such as `IAuthorizationService` to evaluate policies. |
|
|
|
|
|
```cs |
|
|
@inject IAuthorizationService AuthorizationService |
|
|
|
|
|
<button @onclick="@DoSomething">Do something important</button> |
|
|
|
|
|
@functions { |
|
|
[CascadingParameter] Task<AuthenticationState> authenticationStateTask { get; set; } |
|
|
|
|
|
async Task DoSomething() |
|
|
{ |
|
|
var user = (await authenticationStateTask).User; |
|
|
|
|
|
if (user.Identity.IsAuthenticated) |
|
|
{ |
|
|
// Perform some action only available to authenticated (logged-in) users |
|
|
} |
|
|
|
|
|
if (user.IsInRole("admin")) |
|
|
{ |
|
|
// Perform some action only available to users in the 'admin' role |
|
|
} |
|
|
|
|
|
if ((await AuthorizationService.AuthorizeAsync(user, "content-editor")).Succeeded) |
|
|
{ |
|
|
// Perform some action only available to users satifying the 'content-editor' policy |
|
|
} |
|
|
} |
|
|
} |
|
|
``` |
|
|
|
|
|
#### A reminder about authorization in client-side Blazor |
|
|
|
|
|
With server-side Blazor, these checks cannot be bypassed, because the code runs on the server. But with client-side Blazor, the checks *can* be bypassed because all client-side code can be modified by users. The same is true for all client-side application technologies, including JavaScript SPA frameworks or native apps for any operating system. |
|
|
|
|
|
So, you must always remember to perform authorization checks on your server within any API endpoints accessed by your client-side application. |
SteveSandersonMS created this gist