Last active
June 5, 2023 16:26
-
-
Save sampathshivakumar/163804095a182862acc2965fc937fddf to your computer and use it in GitHub Desktop.
Revisions
-
sampathshivakumar revised this gist
Jun 5, 2023 . 1 changed file with 1 addition and 1 deletion.There are no files selected for viewing
This file contains hidden or bidirectional Unicode text that may be interpreted or compiled differently than what appears below. To review, open the file in an editor that reveals hidden Unicode characters. Learn more about bidirectional Unicode charactersOriginal file line number Diff line number Diff line change @@ -262,7 +262,7 @@ def lambda_handler(event, context):  ## Now we can add the records.Serverless Web Application is successfully created. **Note: Special thanks to Amit Nag sir,Code is taken from his GitHub https://github.com/nspacer/serverless-website-hosting , i have not written the code myself.** **Thank you for reading this post! I hope you found it helpful. If you have any feedback or questions,Please connect with me on LinkedIn at https://www.linkedin.com/in/sampathsivakumar-boddeti-1666b810b/. Your feedback is valuable to me. Thank you!** -
Jun 4, 2023 . 1 changed file with 2 additions and 0 deletions.There are no files selected for viewing
This file contains hidden or bidirectional Unicode text that may be interpreted or compiled differently than what appears below. To review, open the file in an editor that reveals hidden Unicode characters. Learn more about bidirectional Unicode charactersOriginal file line number Diff line number Diff line change @@ -9,6 +9,8 @@ * **It is particularly beneficial for applications with varying workloads, sporadic usage patterns, and the need for rapid innovation.** ### Prerequisites. * **AWS Account** **My GitHub Repo:** https://github.com/sampathshivakumar/Serverless-Web-Application ### Let's start with Hosting our Application on S3 Bucket. **Create a bucket** -
Jun 3, 2023 . 1 changed file with 6 additions and 0 deletions.There are no files selected for viewing
This file contains hidden or bidirectional Unicode text that may be interpreted or compiled differently than what appears below. To review, open the file in an editor that reveals hidden Unicode characters. Learn more about bidirectional Unicode charactersOriginal file line number Diff line number Diff line change @@ -253,6 +253,12 @@ def lambda_handler(event, context):     ## Now we can add the records.Serverless Web Application is successfully created. **Note: Code is taken from https://github.com/nspacer/serverless-website-hosting , i have not written the code myself.** -
Jun 3, 2023 . 1 changed file with 1 addition and 1 deletion.There are no files selected for viewing
This file contains hidden or bidirectional Unicode text that may be interpreted or compiled differently than what appears below. To review, open the file in an editor that reveals hidden Unicode characters. Learn more about bidirectional Unicode charactersOriginal file line number Diff line number Diff line change @@ -254,7 +254,7 @@ def lambda_handler(event, context):  ## Now we can add the records.Serverless Web Application is successfully created. **Note: Code is taken from https://github.com/nspacer/serverless-website-hosting , i have not written the code myself.** **Thank you for reading this post! I hope you found it helpful. If you have any feedback or questions,Please connect with me on LinkedIn at https://www.linkedin.com/in/sampathsivakumar-boddeti-1666b810b/. Your feedback is valuable to me. Thank you!** -
Jun 3, 2023 . 1 changed file with 1 addition and 0 deletions.There are no files selected for viewing
This file contains hidden or bidirectional Unicode text that may be interpreted or compiled differently than what appears below. To review, open the file in an editor that reveals hidden Unicode characters. Learn more about bidirectional Unicode charactersOriginal file line number Diff line number Diff line change @@ -254,6 +254,7 @@ def lambda_handler(event, context):  ## Now we can add the records.Serverless Web Application is successfully created. **Note: Code is taken from https://github.com/nspacer/serverless-website-hosting , i have not written the code myself. **Thank you for reading this post! I hope you found it helpful. If you have any feedback or questions,Please connect with me on LinkedIn at https://www.linkedin.com/in/sampathsivakumar-boddeti-1666b810b/. Your feedback is valuable to me. Thank you!** -
Jun 3, 2023 . 1 changed file with 63 additions and 0 deletions.There are no files selected for viewing
This file contains hidden or bidirectional Unicode text that may be interpreted or compiled differently than what appears below. To review, open the file in an editor that reveals hidden Unicode characters. Learn more about bidirectional Unicode charactersOriginal file line number Diff line number Diff line change @@ -193,6 +193,69 @@ def lambda_handler(event, context): ### Now we will integrate both Frount-End and Back-End part with help of API-Gateway.  **We will create a REST-API**  **Select New API, give API name and Endpoint Type and click create API.**     **Now my Get method is done**  **Now lets create POST Method**   **Now we have to Deploy the API Gateway**   **Now lets enable CORS**    **Now our API-Gateway url is ready**  **We need to copy Invoke URL in Script file and again upload into S3 Bucket**   ### Everything is setup. Now lets see the output.  **We know that we have saved one record in DynamoDB during Test of lambda function. So if i click view all employee Profile, it should show the profile**   ## Now we can add the records.Serverless Web Application is successfully created. **Thank you for reading this post! I hope you found it helpful. If you have any feedback or questions,Please connect with me on LinkedIn at https://www.linkedin.com/in/sampathsivakumar-boddeti-1666b810b/. Your feedback is valuable to me. Thank you!** -
Jun 3, 2023 .There are no files selected for viewing
This file contains hidden or bidirectional Unicode text that may be interpreted or compiled differently than what appears below. To review, open the file in an editor that reveals hidden Unicode characters. Learn more about bidirectional Unicode charactersOriginal file line number Diff line number Diff line change @@ -0,0 +1,199 @@ ## How to Build Serverless Web Application in AWS.  ### What is Serverless? * **Serverless computing is a cloud computing model where developers write and deploy code as individual functions or services without managing servers.** * **The cloud provider takes care of infrastructure provisioning, scaling, and maintenance.** * **Developers focus solely on writing code, and the platform automatically allocates resources and scales applications based on demand.** ### Why Serverless? * **serverless computing provides developers with a more streamlined and efficient development experience while delivering automatic scaling, cost savings, and improved agility.** * **It is particularly beneficial for applications with varying workloads, sporadic usage patterns, and the need for rapid innovation.** ### Prerequisites. * **AWS Account** ### Let's start with Hosting our Application on S3 Bucket. **Create a bucket**  **Give Bucket name "dynamic-website-s3",Tag key="owner" value="sampath", rest all looks good and clik on Create bucket.**  **Now upload the Web-Content in S3 bucket**   **As of now we can't access the content on S3 as my bucket is not public**  **Go to properties tab and enable static website hosting, then in Index document typed profile.html and click save changes.**  **Go to Permissions tab and edit Block public access (bucket settings) , UnBlock all public access and save settings.**  **Edit Bucket policy in Permissions tab to make contents of S3 Bucket public**  **Now we can access the url of S3 Bucket static website.**  **As of now it can't save your data as we have not connected it to any database**  **Lets create a cloudfront and access the website using cloudfront.**  **As we have enabled static-website on S3 bucket it is asking us to go with Bucket website endpoint** **In our previous post we went with Bucket website endpoint, so now lets go with Bucket endpoint only.** **For that we need to disable Static website hosting, delete Bucket policy and block the public access to bucket**  **disable Static website hosting, deleted Bucket policy, block the public access**  **See Now its not showing any popup**  **Select Origin access type to Origin access control settings (recommended) and Create control setting and save**   **After Create distribution update the bucket policy to allow cloundfront to access the s3 bucket**   **Now the we can access the S3 Bucket using cloudfront Distribution domain name** 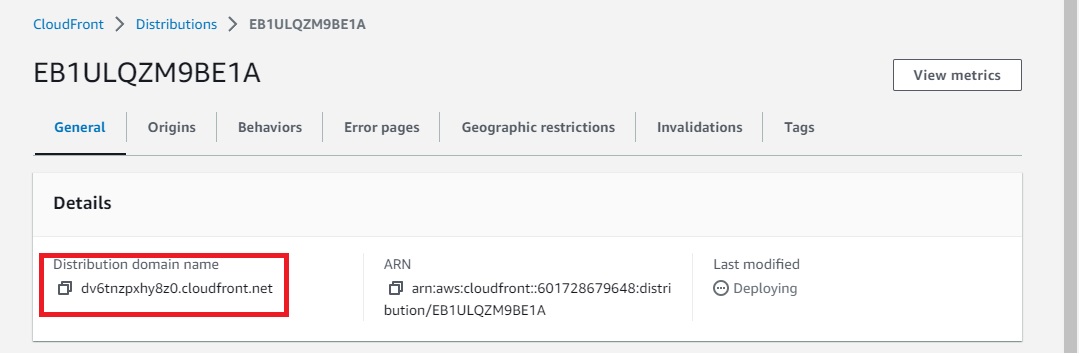 **To access the profile.html with Distribution domain name directly, mention profile.html in Default root object of settings.**  ### Now let's create DynamoDB Table  **Enter Table name = employeeProfile, Partition key = empId, tag key/value owner/sampath and create table.**  ### While the DynamoDB table is creating, lets create Lambda functions **Lets create a lambda function to get data from DynamoDB**   **Create a lambda role to access DynamoDB and select that role to lambda function**  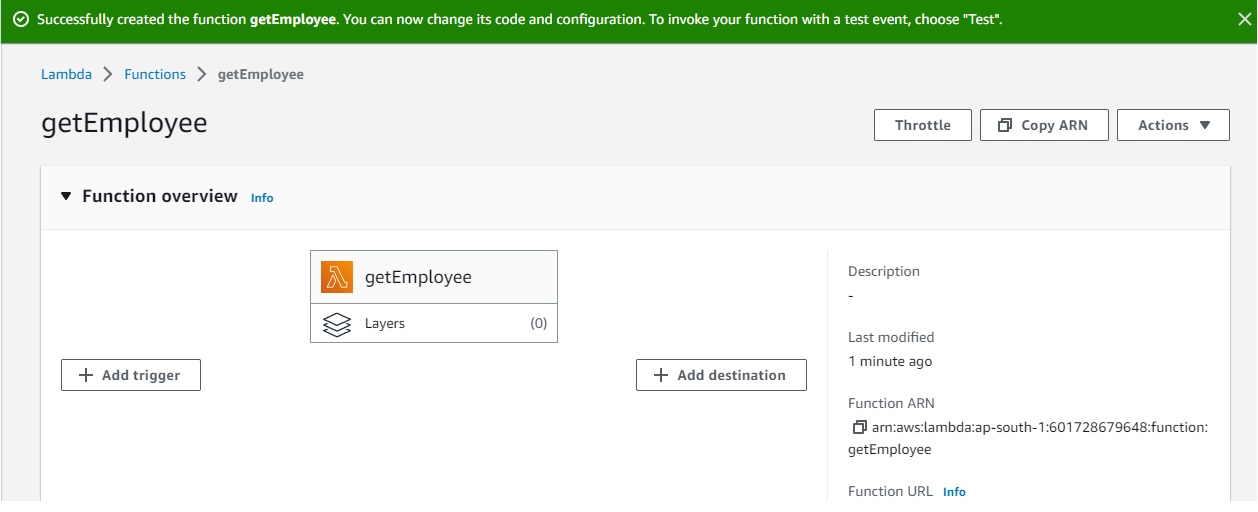 **Write a small code for lambda to function and deploy** ``` import json import boto3 def lambda_handler(event, context): dynamodb = boto3.resource('dynamodb', region_name='ap-south-1') table = dynamodb.Table('employeeProfile') response = table.scan() data = response['Items'] while 'LastEvaluatedKey' in response: response = table.scan(ExclusiveStartKey=response['LastEvaluatedKey']) data.extend(response['Items']) return data ```  **Lets create a 2nd lambda function to insert data into DynamoDB**  **Copy and past the code in lambda function** ``` import json import boto3 # create a DynamoDB object using the AWS SDK dynamodb = boto3.resource('dynamodb') # use the DynamoDB object to select our table table = dynamodb.Table('employeeProfile') # define the handler function that the Lambda service will use as an entry point def lambda_handler(event, context): # extract values from the event object we got from the Lambda service and store in a variable firstname = event['empFirstName'] id=event['empId'] lastname=event['empLastName'] age=event['empAge'] # write name and time to the DynamoDB table using the object we instantiated and save response in a variable response = table.put_item( Item={ 'empId': id, 'empAge':age, 'empFirstName':firstname, 'empLastName':lastname }) # return a properly formatted JSON object return { 'statusCode': 200, 'body': json.dumps('Hello from Lambda, ' + firstname) } ``` **Deploy**  **By now our DynamoDB Table will be ready**  **Lets go inside DynamoDB table and Explore table items, you can see anything**  **Now lets test our 2nd lambda function, try to insert some data into DynamoDB using lambda function**  **Test successful**  **Lets look in to DynamoDB table**  **Both lambda functions are working fine with DynamoDB, Our Backend is ready** ### Now we will integrate both Frount-End and Back-End part with help of API-Gateway.